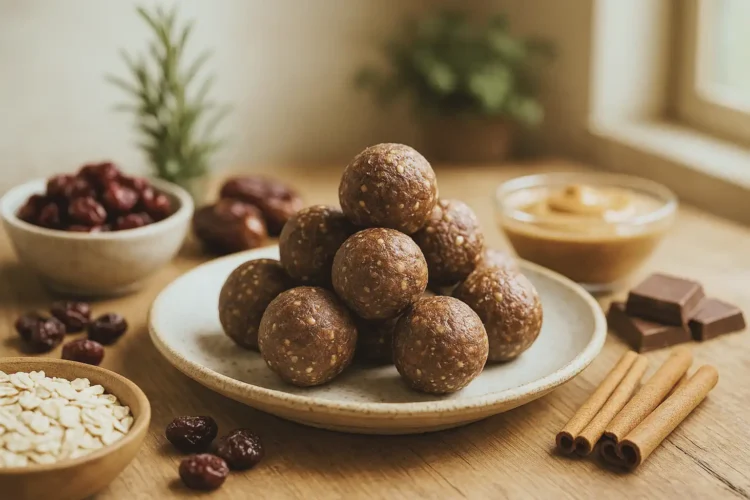
I’ve made a lot of energy balls over the years. But none have earned a permanent spot in my fridge quite like these anti-inflammatory energy balls. They are cozy little power bites made with everyday healing ingredients that support your body naturally. I first created them during a season of high inflammation when I needed something quick, nourishing, and stabilizing between clients. Since then, they have become a go-to snack I share with clients and friends alike. These are simple, satisfying, and supportive of the kind of healing we all need more of. Let’s get into it.
Why You’ll Love This Recipe
These anti-inflammatory energy bites are more than just a snack. They’re comfort food with purpose. Here’s why they’ve become a staple in my kitchen and my clients’ weekly meal prep:
• Quick to make with no baking involved
• Filled with real, whole ingredients you likely already have
• Naturally sweet with no refined sugar
• Ideal for afternoon slumps, post-workout fuel, or travel snacks
• Freezer-friendly and perfect for make-ahead convenience
• Balanced with healthy fats, fiber, and plant-based protein
What sets this recipe apart is the flavor. The combination of tart cherries, cocoa, and almond butter creates a rich bite that satisfies your sweet tooth without overwhelming your body. Think of it as comfort that actually supports your health.
Ingredients You’ll Need (and Why They Matter)
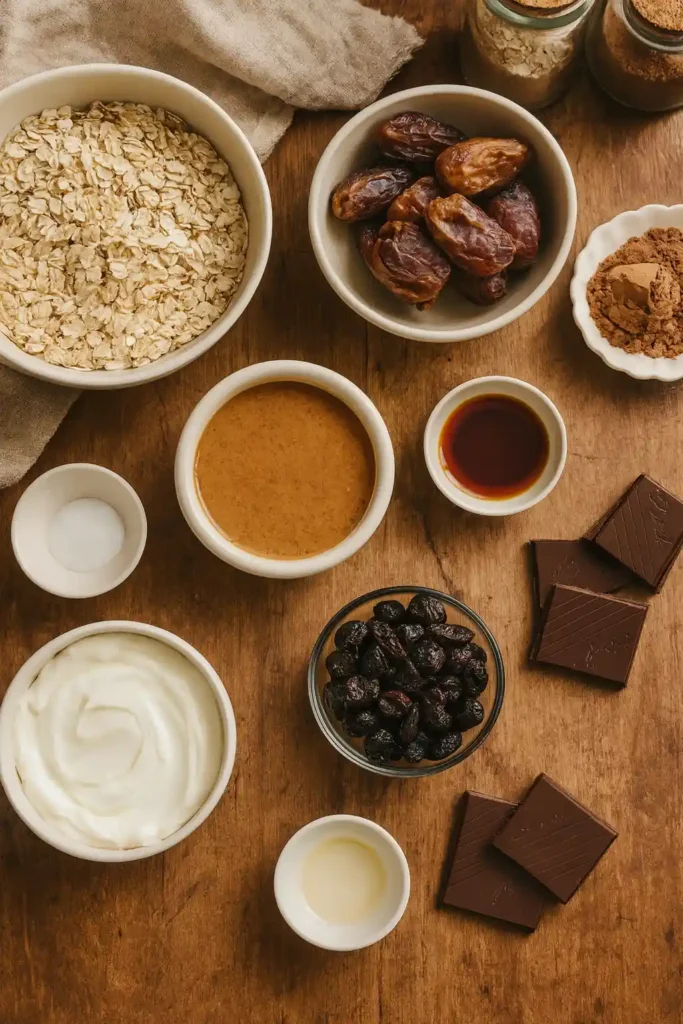
These ingredients are more than pantry staples. Each one has a purpose rooted in healing. Here’s what you’ll need, along with how each ingredient supports your body.
For the base
• Pitted dried dates: A natural sweetener rich in fiber, potassium, and antioxidants that support digestion and energy without added sugar.
• Unsweetened dried tart cherries: One of nature’s most powerful anti-inflammatory fruits, packed with polyphenols and anthocyanins that support muscle recovery and joint health.
• Unsweetened almond butter: A creamy binder full of vitamin E, healthy fats, and magnesium, which all help lower inflammation markers.
• Plain-strained Greek-style yogurt (whole milk): Offers probiotics and protein to support gut health and keep blood sugar steady.
• Unsweetened cocoa powder: A natural source of flavonoids, which have been shown to improve blood flow and calm oxidative stress.
• Pure vanilla extract: Adds flavor and a trace of antioxidants without overwhelming sweetness.
• Sea salt: A pinch of salt enhances flavor and helps balance electrolytes naturally.
For structure and texture
• Old-fashioned rolled oats: High in soluble fiber, oats support gut health and keep you full longer.
• Dark chocolate (at least 70 percent cocoa): Contains polyphenols that fight inflammation and deliver mood-boosting benefits.
• Ground cinnamon: A warming spice that helps stabilize blood sugar and adds natural sweetness without sugar.
Each ingredient works together to create a snack that supports your body, satisfies your cravings, and makes healing feel a little more doable.
How to Make Anti-Inflammatory Energy Balls
These bites come together in a few easy steps with minimal prep. Here’s how to make them from start to finish.
Step 1: Soften the dried fruit
Place the pitted dates and tart cherries in a small heatproof bowl. Pour enough boiling water over them to fully cover the fruit. Let them soak for about ten minutes. This softens the texture, making them easier to blend and digest.
Step 2: Drain and prep the base
Drain the softened fruit thoroughly and add it to a food processor. Pulse five times until the mixture is roughly chopped and has a sticky consistency.
Step 3: Blend in the creamy ingredients
Add almond butter, Greek yogurt, cocoa powder, vanilla extract, and sea salt to the processor. Blend five to ten times until everything begins to come together into a thick, slightly glossy mixture.
Step 4: Add the oats and pulse again
Toss in the rolled oats and pulse about fifteen times until the oats are evenly distributed. The mixture should be firm but pliable. If it feels dry or crumbly, add a splash of water to bring it together.
Step 5: Chill the mixture
Transfer the mixture to a medium bowl. Cover it and place in the refrigerator for about ten minutes. Chilling makes the mixture easier to shape and helps the ingredients set.
Step 6: Roll into bite-sized balls
Scoop out one tablespoon at a time and roll between your hands to form one-inch balls. Place them on a parchment-lined plate or tray as you go.
Step 7: Melt and drizzle the chocolate
Add the dark chocolate pieces to a small microwave-safe bowl. Heat in thirty-second intervals, stirring between each, until the chocolate is smooth and melted.
Step 8: Finish with cinnamon
Drizzle the melted chocolate over the rolled balls. While the chocolate is still soft, sprinkle each one with a light dusting of ground cinnamon.
Step 9: Set and store
Let the energy balls sit in the fridge uncovered for at least ten minutes so the chocolate can set. After that, they are ready to enjoy or store for later.
That’s it. No baking. No fuss. Just nourishing, satisfying bites that support your energy and your health.
Serving and Storage Tips
These energy balls are incredibly versatile and work well in many situations. Here’s how to serve and store them for the best flavor and texture.
Serving Suggestions
Serve them chilled straight from the fridge for the most satisfying texture. They also hold up well at room temperature, making them great for lunchboxes, road trips, or post-workout snacks. For a dessert-like twist, try pairing them with a hot cup of herbal tea or a small scoop of coconut yogurt.
Storage Tips
Place the energy balls in an airtight container. They will keep in the refrigerator for up to one week. For longer storage, freeze them in a single layer on a baking sheet until firm, then transfer to a sealed bag or container. They’ll stay fresh in the freezer for up to three months. Let them thaw at room temperature for about fifteen minutes before eating.
Helpful Notes
Here are a few extra tips to make sure your energy balls turn out just right every time.
• If your mixture feels too dry to roll, add a splash of water or a little more yogurt. This helps everything bind without becoming too sticky.
• Want to boost the anti-inflammatory benefits even more? Add a pinch of ground turmeric or grated fresh ginger to the mix. Both bring warmth and healing power.
• No food processor? You can mash the soaked fruit by hand with a fork and stir the rest in. The texture will be a bit more rustic but still delicious.
• Swap the almond butter for sunflower seed butter or tahini if you need a nut-free version.
• If your hands get sticky while rolling, lightly dampen them with water to help shape the balls more easily.
• For added texture, roll finished balls in crushed walnuts, chia seeds, or shredded coconut before the chocolate drizzle.
These little tweaks make the recipe flexible and friendly for your taste or dietary needs.
Conclusion
These anti-inflammatory energy balls are one of those recipes I come back to again and again. They are simple to make, deeply nourishing, and packed with ingredients your body actually appreciates. Whether you are managing inflammation, need a balanced snack, or just want something sweet without the crash, this recipe delivers.
If you try these, I would love to hear how they turned out for you. Please leave a comment and a star rating below to share your experience. Your feedback helps others and keeps this space growing.
Feel free to share this recipe with someone who needs a little snack inspiration. You can pin it on Pinterest or post it to Facebook.
What twist did you add to make it your own? I’d love to know. Let’s keep making food that feels good.
Are anti-inflammatory energy balls healthy?
Yes, absolutely. These bites are made with whole food ingredients that support your body naturally. The combination of healthy fats, fiber, antioxidants, and natural sugars helps stabilize energy without triggering inflammation or blood sugar spikes.
How many energy balls can I eat a day?
It depends on your needs and activity level. Two to three balls make a balanced snack for most people. They are nutrient-dense, so a little goes a long way. If you are very active, you might enjoy a few more.
What’s the best way to store energy balls?
Keep them in an airtight container in the fridge. They will stay fresh for about seven days. For longer storage, freeze them and thaw at room temperature for a few minutes before eating.
Are dates good for you?
Yes. Dates are naturally rich in fiber, potassium, and antioxidants. They help sweeten the recipe without processed sugar and also support digestion and energy levels.
Can I use different ingredients?
Absolutely. This recipe is flexible. You can swap the almond butter for peanut or cashew butter, use raisins instead of cherries, or add flaxseed, hemp hearts, or protein powder for a nutrient boost.
Are these safe for kids?
Yes, they are great for lunchboxes or after-school snacks. Just make sure there are no allergies to nuts or dairy if you are packing them for school. You can always swap ingredients to make them school-safe.

Anti-Inflammatory Energy Balls Recipe
20
balls15
minutes10
minutes25
minutesBoost energy with Anti-Inflammatory Energy Balls made from nutrient-rich ingredients.
Ingredients
1 cup pitted dried dates
1⁄3 cup unsweetened dried tart cherries
1⁄2 cup unsalted almond butter
1⁄4 cup plain whole-milk Greek yogurt
2 tablespoons unsweetened cocoa powder
1 teaspoon pure vanilla extract
1⁄2 teaspoon sea salt
1 1⁄3 cups old-fashioned rolled oats
1 ounce dark chocolate (70 percent), broken into pieces
1⁄2 teaspoon ground cinnamon
Directions
- In a small heatproof bowl, cover dates and cherries with boiling water. Soak for 10 minutes, then drain well.
- Pulse fruit in a food processor 5 times. Add almond butter, yogurt, cocoa, vanilla, and salt. Pulse until combined.
- Add oats to the mixture. Pulse until fully incorporated. Add a splash of water if the mixture feels too dry.
- Transfer to a bowl, cover, and refrigerate for 10 minutes to firm.
- Shape into 1-inch balls using a tablespoon of mixture per ball.
- Microwave the chocolate in 30-second bursts, stirring between each burst, until smooth.
- Drizzle chocolate over the balls and sprinkle with cinnamon.
- Refrigerate for 10 minutes until the chocolate sets.
Nutrition Facts
- Calories: 120kcal
- Fat: 6g
- Carbohydrates: 15g
- Fiber: 4g
- Protein: 4g